Recording Guide
Recording an event can be as simple or as complex as you want it to be. Choose a recording workflow that fits your budget, capabilities, and needs. Think about recording gear, whether to record a board mix or room sound or both, and what software to use to record.
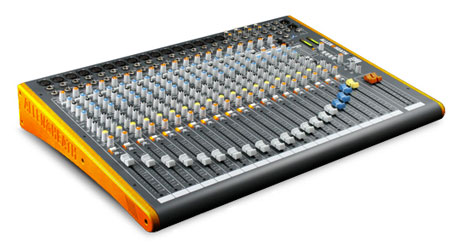
The audio engineer running the sound for the event will typically have an extra audio output on the sound board that you can use to record a copy of the sound that's heard through the sound system at the event. The appropriate cable should be used to connect the output of the engineer’s sound board to the input of the recording device.
If you’re looking for the all-in-one package, the standalone or “handheld” recorder is your best bet. These are devices that are the complete package. They typically contain an external microphone on one side or a few input jacks to plug in audio cables to (some even have both) and have internal storage so you can record directly onto the device. They’re essentially little computers that only do one thing: record. So, most come equipped with screens in order to configure them and some just have a few buttons, such as a single record button.
Below are some recommended portable recorders that come equipped with built-in microphones.
zoom
2 inputs
approx. $100
tascam
2 inputs
approx. $100
tascam
4 inputs
approx. $200
zoom
2 inputs
approx. $160
tascam
2 inputs
approx. $300
zoom
4 inputs
approx. $250
roland
2 inputs
approx. $200
zoom
6 inputs
approx. $400
roland
6 inputs
approx. $500
Marantz
2 inputs
approx. $450
If you own an iPhone or an iPad there are many microphones and recording interfaces you can choose from that are specifically designed for your Apple device.
Below are microphones designed specifically for iOS devices. These microphones can be simply plugged in directly to your iPhone or iPad without the need for special adapters or cables:
tascam
stereo
30-pin
approx. $50
blue
stereo
30-pin / lightning
approx. $100
zoom
stereo
lightning
approx. $100
rØde
stereo
30-pin
approx. $150
IK Multimedia
1 input
⅛ jack
approx. $40
tascam
1 input
⅛ jack
approx. $60
behringer
2 inputs
iPad only
approx. $100
focusrite
2 inputs
USB / 30-pin
approx. $120
IK Multimedia
1 input
USB / lightning
approx. $150
alesis
2 inputs
iPad only
approx. $200
apogee
2 inputs
iPad / Mac
approx. $350
alesis
4 inputs
iPad only
approx. $300
apogee
4 inputs
USB
approx. $1500
A USB microphone is a nice addition if you already have a laptop but don’t necessarily have a microphone to record with. With a USB Microphone you don’t need an expensive audio interface, all you need to do is plug the USB Microphone into your computer or iPad and your recording software will see it as an audio input. Most USB microphones should work with either a Mac or PC. If you’re using an iPad the Camera Connection Kit is required in order to use any USB microphone as well as a powered USB hub.
alesis
stereo
approx. $50
samson
mono
approx. $100
mxl
stereo
approx. $250
blue
stereo
approx. $150
Audio technica
mono
approx. $150
apogee
mono
approx. $250
blue
stereo
approx. $250
USB Audio Interfaces are USB devices that convert analog audio inputs into a digital stream so computers can interpret and save audio signals. Most USB Audio Interfaces are designed to work with desktop and laptop computers. However, due to the popularity of the iPad, more and more USB Audio Interfaces are being designed to work with mobile devices as well.
ART
2 inputs
16-bit / 44.1 kHz
approx. $100
alesis
2 inputs
24-bit / 48 kHz
approx. $150
presonus
2 inputs
24-bit / 48 kHz
approx. $150
focusrite
2 inputs
approx. $150
roland
2 inputs
24-bit / 48 kHz
approx. $200
avid
2 inputs
24-bit / 48 kHz
approx. $200
apogee
2 inputs
24-bit / 192 kHz
approx. $600
sound devices
2 inputs
24-bit / 192 kHz
approx. $850
Lexicon
4 inputs
24-bit / 48 kHz
approx. $200
behringer
4 inputs
24-bit / 96 kHz
approx. $200
akai
4 inputs
16-bit / 44.1 kHz
approx. $200
akai
4 inputs
24-bit / 96 kHz
approx. $250
m-audio
4 inputs
24-bit / 96 kHz
approx. $250
presonus
4 inputs
24-bit / 96 kHz
approx. $300
avid
4 inputs
24-bit / 96 kHz
approx. $300
If you’re using a standalone audio interface and you plan on capturing the sound of the room, you’ll need a microphone, preferably a stereo microphone or a matched pair of microphones designed to be used together. Stereo Microphones are easier to use and require less setup since the microphone capsules are already constructed to capture a stereo image. However, stereo microphones tend to cost more. A matched pair, on the other hand, are more affordable, and are essentially 2 separate microphones that require the user to manually position the microphones in order to record a proper stereo image.
Here are some recommended Stereo Microphones and Matched Pair microphones.
Audio Technica
stereo
approx. $70
mxl
stereo
approx. $200
Audio Technica
stereo
approx. $250
Audio Technica
stereo
approx. $400
rØde
stereo
approx. $530
Audio Technica
stereo
approx. $650
shure
stereo
approx. $760
Behringer
pair
approx. $60
samson
pair
approx. $140
rØde
pair
approx. $200
M-Audio
pair
approx. $200
studio projects
pair
approx. $350
rØde
pair
approx. $430
Se Electronics
pair
approx. $600
When deciding how you would like to record the show you should consider the different characteristics of the sound recorded by a microphone placed in the room and the sound coming directly from the sound board. A room microphone will pick up the overall sound/acoustics of the venue and give depth to a recording while the board mix will contain more direct and accurate sounds.
During or after recording we recommended applying dynamic compression, artificial reverb, and/or a high pass filter be to increase the recording quality of your sets.
Applying compression can help smooth out the difference between the quiet and loud sounds and can generally lead to a more polished sound.
Artificial reverb can help accentuate the acoustics of the room the performance was recorded in or can be used to add reverberation to rooms that don’t have a lot of character and give the recording a more lively feel.
A High Pass Filter should be used to eliminate the unwanted rumble and low-frequency noise in a recording.
How to Use Compression
Young Guru's Essentials of Audio MixingHow to Use a Compressor
Ratio, Attack, Release, Knee, etc.Intro to Mixing
With Multiband CompressionIntro to Compression
HomeStudio CornerCompression Made Easy
Compressor Controls & ParametersUsing Compression
A Brief IntroReverb Tutorial
What is reverb?How to Use Reverb Plugins
Waves AudioWhat is Reverb?
A Reverb OverviewIntro to Reverb
Overview ArticleImportance of Space
In a Mix